接上一节:Cocos Creator 3D 入门教程:快速上手,制作第一款游戏!【二】
八、步数显示
我们可以将当前跳的步数显示到界面上,这样在跳跃过程中看着步数的不断增长会十分有成就感。
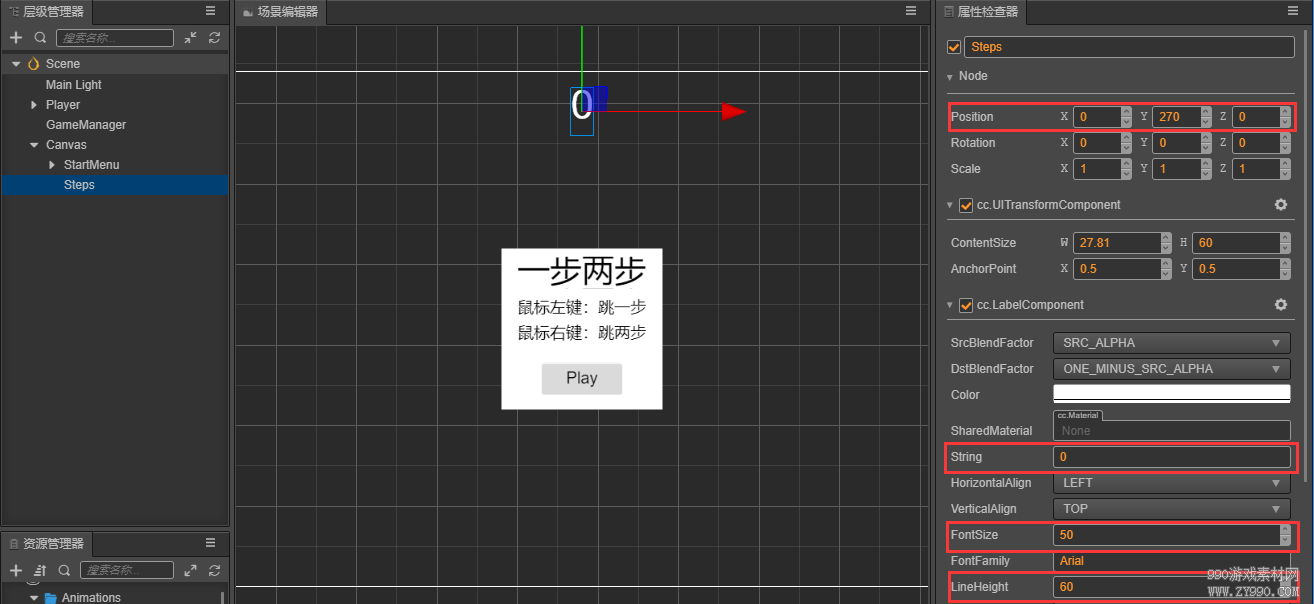
1、在 Canvas 下新建一个名为 Steps 的 Label,调整位置、字体大小等属性。
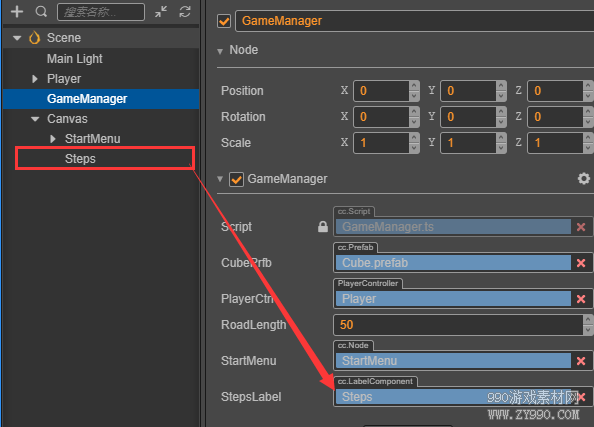
2、在 GameManager 中引用这个 Label:
@property({type: LabelComponent})
public stepsLabel: LabelComponent = null;
3、将当前步数数据更新到这个 Label 中,因为我们现在没有结束界面,游戏结束就跳回开始界面,所以在开始界面要看到上一次跳的步数,因此我们在进入 Playing 状态时,将步数重置为 0。
set curState (value: GameState) {
switch(value) {
case GameState.GS_INIT:
this.init();
break;
case GameState.GS_PLAYING:
this.startMenu.active = false;
this.stepsLabel.string = '0'; // 将步数重置为0
setTimeout(() => { //直接设置active会直接开始监听鼠标事件,做了一下延迟处理
this.playerCtrl.setInputActive(true);
}, 0.1);
break;
case GameState.GS_END:
break;
}
this._curState = value;
}
在响应角色跳跃的函数中,将步数更新到 Label 控件上
onPlayerJumpEnd(moveIndex: number) {
this.stepsLabel.string = '' + moveIndex;
this.checkResult(moveIndex);
}
九、光照和阴影
有光的地方就会有影子,光和影构成明暗交错的 3D 世界。接下来我们为角色加上简单的影子。
1、开启阴影
(2) 在 层级管理器 中点击最顶部的 Scene 节点,将 planarShadows 选项中的 Enabled 打钩,并修改 Distance 和 Normal 参数。

(2)点击 Player 节点下的 Body 节点,将 cc.ModelComponent 下的 ShadowCastingMode 设置为 ON。
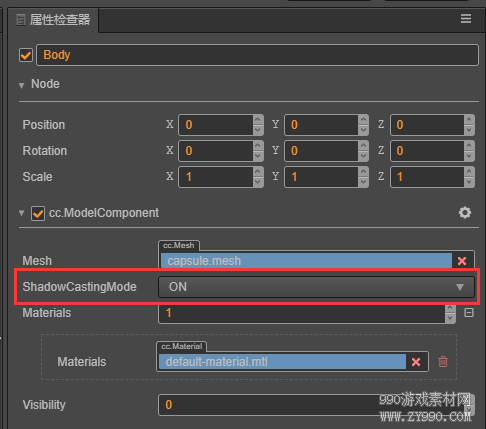
此时在场景编辑器中会看到一个阴影面片,预览会发现看不到这个阴影,因为它在模型的正后方,被胶囊体盖住了。
2、调整光照
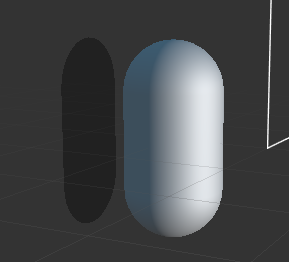
新建场景时默认会添加一个 DirctionalLight,由这个平行光计算阴影,所以为了让阴影换个位置显示,我们可以调整这个平行光的方向。
在 层级管理器 中点击选中 Main Light 节点,调整 Rotation 参数为(-10,17,0)。
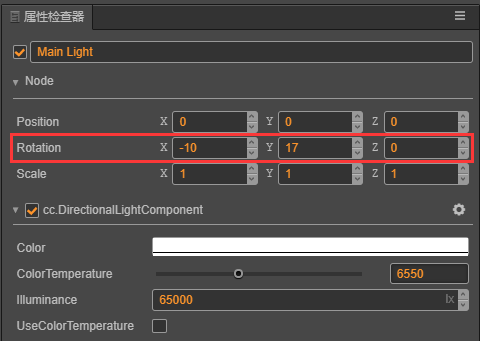
预览可以看到影子效果:

十、添加主角模型
用胶囊体当主角显的有点寒碜,所以我们花(低)重(预)金(算)制作了一个 Cocos 主角。
1、导入模型资源
从原始资源导入模型、材质、动画等资源不是本篇基础教程的重点,所以这边直接使用已经导入工程的资源。
将[项目工程]中 assets 目录下的 Cocos 文件夹拷贝到你自己工程的 assets目录下。
2、添加到场景中
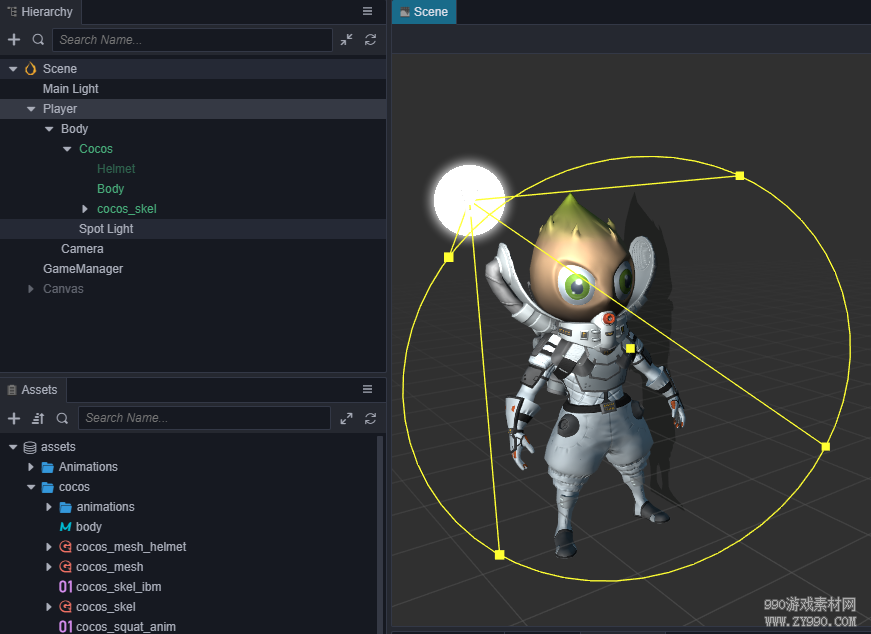
在 Cocos 文件中已经包含了一个名为 Cocos 的 Prefab,将它拖到场景中 Player 下的 Body 节点中。

此时会发现模型有些暗,可以加个聚光灯,以突出它锃光瓦亮的脑门。
3、添加跳跃动画
现在预览可以看到主角初始会有一个待机动画,但是跳跃时还是用这个待机动画会显得很不协调,所以我们在跳跃过程中换成跳跃的动画。在 PlayerController 类中添加一个引用模型动画的变量:
@property({type: SkeletalAnimationComponent})
public CocosAnim: SkeletalAnimationComponent = null;
然后在 Inspector 中要将 Cocos 节点拖入这个变量里。在 jumpByStep 函数中播放跳跃动画
jumpByStep(step: number) {
if (this._isMoving) {
return;
}
this._startJump = true;
this._jumpStep = step;
this._curJumpTime = 0;
this._curJumpSpeed = this._jumpStep / this._jumpTime;
this.node.getPosition(this._curPos);
Vec3.add(this._targetPos, this._curPos, cc.v3(this._jumpStep, 0, 0));
this._isMoving = true;
this.CocosAnim.getState('cocos_anim_jump').speed = 3.5; //跳跃动画时间比较长,这里加速播放
this.CocosAnim.play('cocos_anim_jump'); //播放跳跃动画
if (step === 1) {
//this.BodyAnim.play('oneStep');
} else if (step === 2) {
this.BodyAnim.play('twoStep');
}
this._curMoveIndex += step;
}
在 onOnceJumpEnd 函数中让主角变为待机状态,播放待机动画。
onOnceJumpEnd() {
this._isMoving = false;
this.CocosAnim.play('cocos_anim_idle');
this.node.emit('JumpEnd', this._curMoveIndex);
}
预览效果:

十一、最终代码
PlayerController.ts
import { _decorator, Component, Vec3, systemEvent, SystemEvent, EventMouse, AnimationComponent, SkeletalAnimationComponent } from "cc";
const { ccclass, property } = _decorator;
@ccclass("PlayerController")
export class PlayerController extends Component {
@property({type: AnimationComponent})
public BodyAnim: AnimationComponent = null;
@property({type: SkeletalAnimationComponent})
public CocosAnim: SkeletalAnimationComponent = null;
// for fake tween
private _startJump: boolean = false;
private _jumpStep: number = 0;
private _curJumpTime: number = 0;
private _jumpTime: number = 0.3;
private _curJumpSpeed: number = 0;
private _curPos: Vec3 = cc.v3();
private _deltaPos: Vec3 = cc.v3(0, 0, 0);
private _targetPos: Vec3 = cc.v3();
private _isMoving = false;
private _curMoveIndex = 0;
start () {
}
reset() {
this._curMoveIndex = 0;
}
setInputActive(active: boolean) {
if (active) {
systemEvent.on(SystemEvent.EventType.MOUSE_UP, this.onMouseUp, this);
} else {
systemEvent.off(SystemEvent.EventType.MOUSE_UP, this.onMouseUp, this);
}
}
onMouseUp(event: EventMouse) {
if (event.getButton() === 0) {
this.jumpByStep(1);
} else if (event.getButton() === 2) {
this.jumpByStep(2);
}
}
jumpByStep(step: number) {
if (this._isMoving) {
return;
}
this._startJump = true;
this._jumpStep = step;
this._curJumpTime = 0;
this._curJumpSpeed = this._jumpStep / this._jumpTime;
this.node.getPosition(this._curPos);
Vec3.add(this._targetPos, this._curPos, cc.v3(this._jumpStep, 0, 0));
this._isMoving = true;
this.CocosAnim.getState('cocos_anim_jump').speed = 3.5; //跳跃动画时间比较长,这里加速播放
this.CocosAnim.play('cocos_anim_jump'); //播放跳跃动画
if (step === 1) {
//this.BodyAnim.play('oneStep');
} else if (step === 2) {
this.BodyAnim.play('twoStep');
}
this._curMoveIndex += step;
}
onOnceJumpEnd() {
this._isMoving = false;
this.CocosAnim.play('cocos_anim_idle');
this.node.emit('JumpEnd', this._curMoveIndex);
}
update (deltaTime: number) {
if (this._startJump) {
this._curJumpTime += deltaTime;
if (this._curJumpTime > this._jumpTime) {
// end
this.node.setPosition(this._targetPos);
this._startJump = false;
this.onOnceJumpEnd();
} else {
// tween
this.node.getPosition(this._curPos);
this._deltaPos.x = this._curJumpSpeed * deltaTime;
Vec3.add(this._curPos, this._curPos, this._deltaPos);
this.node.setPosition(this._curPos);
}
}
}
}
GameManager.ts
import { _decorator, Component, Prefab, instantiate, Node, LabelComponent, CCInteger} from "cc";
import { PlayerController } from "./PlayerController";
const { ccclass, property } = _decorator;
enum BlockType{
BT_NONE,
BT_STONE,
};
enum GameState{
GS_INIT,
GS_PLAYING,
GS_END,
};
@ccclass("GameManager")
export class GameManager extends Component {
@property({type: Prefab})
public cubePrfb: Prefab = null;
@property({type: CCInteger})
public roadLength: Number = 50;
private _road: number[] = [];
@property({type: Node})
public startMenu: Node = null;
@property({type: PlayerController})
public playerCtrl: PlayerController = null;
private _curState: GameState = GameState.GS_INIT;
@property({type: LabelComponent})
public stepsLabel: LabelComponent = null;
start () {
this.curState = GameState.GS_INIT;
this.playerCtrl.node.on('JumpEnd', this.onPlayerJumpEnd, this);
}
init() {
this.startMenu.active = true;
this.generateRoad();
this.playerCtrl.setInputActive(false);
this.playerCtrl.node.setPosition(cc.v3());
this.playerCtrl.reset();
}
set curState (value: GameState) {
switch(value) {
case GameState.GS_INIT:
this.init();
break;
case GameState.GS_PLAYING:
this.startMenu.active = false;
this.stepsLabel.string = '0'; // 将步数重置为0
setTimeout(() => { //直接设置active会直接开始监听鼠标事件,做了一下延迟处理
this.playerCtrl.setInputActive(true);
}, 0.1);
break;
case GameState.GS_END:
break;
}
this._curState = value;
}
generateRoad() {
this.node.removeAllChildren();
this._road = [];
// startPos
this._road.push(BlockType.BT_STONE);
for (let i = 1; i < this.roadLength; i++) {
if (this._road[i-1] === BlockType.BT_NONE) {
this._road.push(BlockType.BT_STONE);
} else {
this._road.push(Math.floor(Math.random() * 2));
}
}
for (let j = 0; j < this._road.length; j++) {
let block: Node = this.spawnBlockByType(this._road[j]);
if (block) {
this.node.addChild(block);
block.setPosition(j, -1.5, 0);
}
}
}
spawnBlockByType(type: BlockType) {
let block = null;
switch(type) {
case BlockType.BT_STONE:
block = instantiate(this.cubePrfb);
break;
}
return block;
}
onStartButtonClicked() {
this.curState = GameState.GS_PLAYING;
}
checkResult(moveIndex: number) {
if (moveIndex <= this.roadLength) {
if (this._road[moveIndex] == BlockType.BT_NONE) { //跳到了空方块上
this.curState = GameState.GS_INIT;
}
} else { // 跳过了最大长度
this.curState = GameState.GS_INIT;
}
}
onPlayerJumpEnd(moveIndex: number) {
this.stepsLabel.string = '' + moveIndex;
this.checkResult(moveIndex);
}
// update (deltaTime: number) {
// // Your update function goes here.
// }
}
十二、总结
希望这篇快速入门教程能帮助您了解 Cocos Creator 3D 游戏开发流程中的基本概念和工作流程。如果您对编写和学习脚本编程不感兴趣,也可以直接从完成版的项目工程中把写好的脚本复制过来使用。
接下来您还可以继续完善游戏的各方各面,以下是一些推荐的改进方向:
- 为游戏增加难度,当角色在原地停留 1 秒就算失败
- 改为无限跑道,动态的删除已经跑过的跑道,延长后面的跑道。
- 增加游戏音效
- 为游戏增加结束菜单界面,统计玩家跳跃步数和所花的时间
- 用更漂亮的资源替换角色和跑道
- 可以增加一些可拾取物品来引导玩家“犯错”
- 添加一些粒子特效,例如角色运动时的拖尾、落地时的灰尘
- 为触屏设备加入两个操作按钮来代替鼠标左右键操作
下载完整工程:
https://wzyz.lanzoui.com/iAFwRr23y4f
仓库地址:
https://github.com/cocos-creator/docs-3d/tree/master/zh/getting-started/first-game